mb5370
Background
JCU PhD student Julia Hung is studying metabolic processes within the black band disease (BBD) community. In 2023 she collected fresh samples of BBD from infected individuals of the coral, Acropora hyacynthus at Orpheus Island. She successfully extracted high molecular weight DNA from these samples and sequenced them using an oxford nanopore MinION sequencer.
You have been provided with a subset of Julia’s data which should be sufficient to generate a useful metagenome assembly. We will not be working with the full dataset because the computing resources required to do so are too large for a class setting.
In this workshop we will perform an analysis of the black band disease metagenome. At the end of that workshop you should have assembled reads from nanopore sequencing of black band disease, classified the assembled contigs into bins using metabat2, and then performed some functional analysis on the genomes to see what genes are prominent in the bacterial community of this disease.
Workshop Timeline
- Do before the workshop: Steps 1-4. These take several hours to run. If you haven’t done them by the final workshop start directly at step 5
- During the final workshop: Steps 5 onward
Setup
This final workshop is the one you should document on github for assessment. This time, instead of creating a new project directly in RStudio you should first create a repository on github and then make a new project using the git project type. The process is documented here
In these instructions we will assume that your repository is called marine-genomics and you checked it out in your home directory. After checking out the repository test this by using pwd as follows
pwd
It should print something like /home/jdXXXX/marine-genomics where jdXXX is your student login id.
Step 1: Document your work
Exactly how you do this is up to you. I recommend using an RMarkdown document for each main logical step and numbering them. For example I would probably have documents like
01_assembly.Rmd01_binning.Rmd02_checkm.Rmd
and so on.
Then I would make links in my README.md to each of the rendered versions of these. I do this for every paper I publish. If you want to see an example here is one from a paper on coral genetics
Alternatively you could decide to put everything into a single RMarkdown or even just edit the README file directly. It is up to you.
Whatever you do though you will need to add these documentation files to git and push them to github.
Step 2: Assembly.
This step takes a long time to run. You will need to do it before the final workshop on Thursday. If you didn’t have time to do it that’s OK. You can use some pre-made results (see instructions below)
Assuming you have time to perform this assembly use these instructions to start the job.
First make a directory called flye
mkdir flye
Change directory into flye and then make a symbolic link to the bbd read data
ln -s /pvol/data/metagenome_assembly/bbd_0.1.fastq.gz .
Now make a new shell script called run_flye_bbd.sh and save it inside your flye directory. Edit it so it looks like this
#!/bin/bash
#SBATCH --time=720
#SBATCH --ntasks=12 --mem=10gb

echo "Starting flye bbd in $(pwd) at $(date)"

flye --nano-hq ../raw_data/bbd_0.1.fastq.gz --threads 12 --out-dir bbd --meta

echo "Finished flye bbd in $(pwd) at $(date)"
And now submit your job using
sbatch run_flye_bbd.sh
What to add to git?
This is a good moment to think about what you want to add to git and then push to github. Obviously you will already be adding your RMarkdown docs. You might also want to add shell scripts such as the one you just created. Just be careful to only add this shell script. There are many large files within the flye directory so be very careful not to add any of those to git.
Monitoring job progress
Since lots of people will be trying to run jobs on the server it is likely that yours will wait in the queue until it starts. You can check the queue with the squeue command
squeue
Take a look for your username. When your job is running the ST column will show an R (running). You will also see a new slurm-XXX.out file appear in your flye directory.
This time flye will take quite a while to run. Depending on how many people are running it at the same time it could take many hours. The recommended workflow is to start your run, monitor it for a while to make sure it is working and then allow it to run overnight.
Step 3: Binning with metabat
After your flye assembly has run you should perform binning with metabat.
First cd to the top level of your project. Assuming your project is called marine-genomics you would do this
cd ~/marine-genomics
Now make a metabat directory and cd into it.
mkdir metabat
cd metabat
Extract depth information
cat ../flye/bbd/assembly_info.txt | grep -v '#' | awk '{OFS="\t";print $1,$3}' > depths_bbd.txt
Reorder contigs based on depth
cat depths_bbd.txt | awk '{print $1}' | xargs samtools faidx ../flye/bbd/assembly.fasta > assembly_bbd_ordered.fasta
Run metabat
metabat2 -i assembly_bbd_ordered.fasta -a depths_bbd.txt --cvExt -o bins_bbd/metabat --seed 5
Step 4: Check bin quality with checkm
Now run checkm on the bins created by metabat.
As before cd to the top level of your project. Assuming your project is called marine-genomics you would do this
cd ~/marine-genomics
Make a directory for checkm and cd into it
mkdir checkm
cd checkm
You will need to find the number of your largest contig in the bbd assembly. We need to manually add this contig because it usually isn’t included in the bins from metabat.
This command will display the lengths of all contigs sorted from shortest to longest.
cat ../flye/bbd/assembly.fasta | bioawk -c fastx '{print length($seq),$name}' | sort -n
Once you have found the longest contig substitute its name instead of contig_XX in the code below.
mkdir bins_bbd
cp ../metabat/bins_bbd/*.fa bins_bbd/
samtools faidx ../flye/bbd/assembly.fasta contig_XX > bins_bbd/contig_XX.fa
Next create a slurm script for your checkm run. Your script should look like this and you should save it within your checkm directory as run_checkm_bbd.sh
#!/bin/bash
#SBATCH --time=60
#SBATCH --ntasks=6 --mem=10gb

echo "Starting checkm in $(pwd) at $(date)"

shopt -s expand_aliases
alias checkm='apptainer run -B /pvol/:/pvol /pvol/data/sif/checkm.sif checkm'

checkm lineage_wf bins_bbd out -t 4 -x fa -f checkm_results_bbd.txt

echo "Finished checkm in $(pwd) at $(date)"
Submit your checkm job like this
sbatch run_checkm_bbd.sh
Functional Analysis of the BBD Metagenome
In theory each of the bins from our metagenomic assembly corresponds to a species or strain forming part of the black band disease community. These genomes are valuable resources that can be used to enhance analysis of other data such as RNA sequencing data. In addition (and relevant here), they can be used to make deductions about the metabolic processes occurring within a black band disease lesion. The full process of making these deductions involves quite a bit of biochemical knowledge, literature searching and cross referencing of outputs from many statistical tools. Here we will focus on some preliminary analyses that reveal basic processes within the mat and that provide information on the genes and pathways present.
The overall goal of functional analysis of metagenomes is to answer the following questions
- Who is there, or what taxonomic groups of microbes are present?
- What can they do? (what genes do they have and what biochemical pathways do these support)
Our starting point for functional analysis is a bbd assembly on which we have already performed binning with MetaBat and a quality check with checkm (steps 1-4 above). Files that you will need from these analysis and their expected locations are;
| Analysis Step | File or folder |
|---|---|
| Flye | flye/bbd |
| MetaBAT | metabat/bins_bbd |
| CheckM | checkm/checkm_results_bbd.txt |
Note: Expected locations are given as relative paths within your project for workshop 4.
If any of these steps did not work, or you didn’t get time to complete them, don’t worry. You can retrieve pre-analysed results from a shared folder
(If needed): If your analyses from workshop3 didn’t work you should link in prepared data.
Run the following commands from the top level directory in your project folder for workshop 4.
mkdir -p flye metabat checkm

cd flye/
ln -s /pvol/data/mg/bbd/flye/bbd .

cd ../metabat
ln -s /pvol/data/mg/bbd/metabat/bins_bbd .

cd ../checkm
ln -s /pvol/data/mg/bbd/checkm/checkm_results_bbd.txt .

cd ..
Note: Creating symbolic links will not work if you already have some partially completed results. If you do then you will need to delete those first. Take great care with this. It’s probably best to ask an instructor for help.
Step 5: Select bins based on checkm results
Change directory to the checkm folder.
cd checkm
Now take a look at the results from our checkm analysis. These are summarised in the file checkm_results_bbd.txt
You can view the results in the terminal using cat, head, more or less commands. These all represent different ways to view a text file.
For example
head checkm_results_bbd.txt
If your screen is wide enough this should display the top 10 lines in the file in a nicely formatted way. If your screen is too narrow the lines will wrap and it will be hard to read. Take a look at the Marker lineage column for the top few bins. This column isn’t a full taxonomic classification but it does seem to give family, class or phylum level classification for the top most complete bins. As you go further down the list you will eventually see the marker lineage shift to a very broad level such as k_Bacteria. Try viewing a few more results by telling the head command to show more lines
head -n 20 checkm_results_bbd.txt
In the analyses that follow we would like to focus on the most complete bins because these are likely to contain the majority of useful information on function within the bbd community. These bins will also usually correspond to the most abundant (and therefore best assembled) members of the community. Here we are just using the checkm completeness to assess these factors but a more complete analysis might also look at the size of contigs within the bins and their read coverage.
Let’s focus on bins with a completeness greater than 15%. To extract the bin IDs for these we can use awk. This command should print only the lines where the 13th column has a value greater than 15.
cat checkm_results_bbd.txt | awk '$13>15'
This seems to be the bins we want but we just want the bin ID not the entire line. To get this we can use the print command
cat checkm_results_bbd.txt | awk '$13>15{print $1}'
Now let’s send this output to a file so that we can use it in the next step
cat checkm_results_bbd.txt | awk '$13>15{print $1}' > bbd_topbins.txt
Step 6: Perform taxonomic classification with gtdbtk
First create a folder for gtdbtk in the top level of your project. Then change directory to this folder.
Make sure you are at the top level of your project directory before running these commands.
mkdir gtdbtk
cd gtdbtk
Now create a subfolder within the gtdbtk folder called genomes. This is where we will put a copy of each of the top bins we identified in step 1.
mkdir genomes
This next bit of code is a bit more advanced. Don’t worry if you don’t understand it all. The idea here is that we will iterate over our list of topbins. For each of the topbins we want to copy a file corresponding to that bin into our genomes folder.
We’ll build up the command in steps. First just get the while loop working
while read bin;do echo $bin;done < ../checkm/bbd_topbins.txt
We’re not doing any copying of files yet. Instead, we have used echo $bin to simply print the name of the bin. We need to turn this bin name into a path specifying the fasta file for the bin. So for every bin we need to prepend the path to its folder ../metabat/bins_bbd/ and then append the file extension .fa
while read bin;do echo "../metabat/bins_bbd/${bin}.fa";done < ../checkm/bbd_topbins.txt
Now we are ready to perform the copy
while read bin;do cp "../metabat/bins_bbd/${bin}.fa" genomes;done < ../checkm/bbd_topbins.txt
Check that it worked by listing files within the genomes directory. You should see one file for each of the bins
ls genomes
These bins form input for gtdbtk. We can now run the classification workflow. This is another very resource intensive step. We will need to run it by creating a slurm job script. Hopefully the workflow for this is familiar by now.
First create a blank shell script file and save it inside your gtdbtk directory. Name your file run_gtdbtk.sh
Copy the following code into your run_gtdbtk.sh file and save it.
#!/bin/bash
#SBATCH --time=60
#SBATCH --ntasks=2 --mem=24gb

echo "Starting gtdbtk in $(pwd) at $(date)"

shopt -s expand_aliases
alias gtdbtk='apptainer run -B /pvol:/pvol,/pvol/data/mg/gtdbtkdata/release207_v2/:/refdata /pvol/data/sif/gtdbtk.sif'

gtdbtk classify_wf -x fa --cpus 2 --genome_dir genomes --out_dir out --skip_ani_screen

echo "Finished gtdbtk in $(pwd) at $(date)"
Then submit your job using
sbatch run_gtdbtk.sh
This will take quite a while. While you are waiting you can continue with step 7.
Step 7. Find and annotate genes with prokka
Our ultimate goal is to use the BBD metagenome to improve our understanding of metabolic processes within the mat. A crucial step toward this is identifying the genes present within the genomes of bbd taxa. We will be using a program called prokka for this purpose. Prokka will not only identify the gene sequences, it also uses a range of methods to identify homologous genes with known functions. The idea behind this is that if two genes share a common ancestor (ie are homologous) their functions are likely to be similar. This in turn allows Prokka to assign a putative name and function to some of the genes within our newly assembled metagenome bins.
As usual we will create a directory for our prokka work and change to it. Run these commands from the top level directory of your project.
mkdir prokka
cd prokka
First we try running prokka for a single bin. This produces quite a bit of output. Watch the output as it goes by. This output gives a good idea of the various steps prokka goes through.
Next find out the first bin ID in your list
head -n 1 ../checkm/bbd_topbins.txt
In my case this was metabat.5 but your result might be different. Be sure to substitute your own bin id where appropriate in the commands below.
bin=metabat.5
prokka --outdir $bin --prefix $bin  ../metabat/bins_bbd/${bin}.fa
This should run fairly quickly (around 1-2 minutes), and if it works you should end up with a folder called metabat.5. List the contents of this folder. It should look like this
ls metabat.5
metabat.5.err metabat.5.faa metabat.5.ffn metabat.5.fna metabat.5.fsa metabat.5.gbk metabat.5.gff metabat.5.log metabat.5.sqn metabat.5.tbl metabat.5.tsv metabat.5.txt
There are many output files here. For our purposes the most important one is metabat.5.tsv which is a tab separated file with the name of each gene and its inferred name and functional info (if available)
Now we are ready to run prokka on all the metagenomes. This is another computationally intensive step, so it’s time for another slurm script.
Create a new blank text file and save it in your prokka directory. Call it run_prokka.sh and copy the following code into it.
#!/bin/bash
#SBATCH --time=60
#SBATCH --ntasks=2 --mem=2gb

echo "Starting prokka in $(pwd) at $(date)"

shopt -s expand_aliases
alias prokka='apptainer run -B /pvol/:/pvol /pvol/data/sif/prokka.sif prokka'

while read bin;do
  prokka --outdir $bin --prefix $bin "../metabat/bins_bbd/${bin}.fa";
done < ../checkm/bbd_topbins.txt

echo "Finished prokka in $(pwd) at $(date)"
Submit your job with
sbatch run_prokka.sh
While this is running you can keep working on step 4.
Step 8: Infer metabolic pathways
Infering metabolic pathways can be quite complex and is difficult to do in a completely objective or automated fashion. In our case we are lucky because we can refer to the general model of BBD developed by Sato et al.
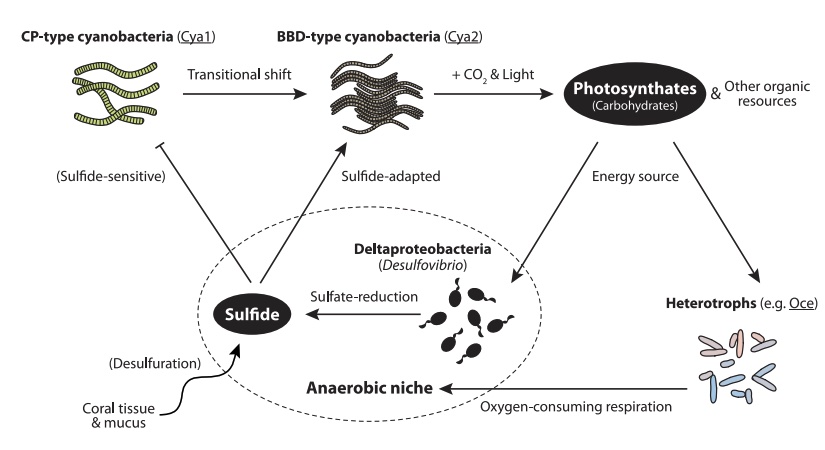
According to this figure we expect to find that the cyanobacteria should be the main organism capable of photosynthesis. We also expect to find some organisms capable of sulfate reduction. Nominally this should be species of Desulfovibrio, however, there may be other organisms with this capability and since our assembled bins for Desulfovibrio are quite incomplete we might not be able to find sulfate-reducing enzymes in this group.
We will use a tool called minpath to take functional info for individual genes and use this to infer the presence of broader biological pathways (involving multiple genes/steps). We will run this on each of the genomes (bins) in our analysis. Minpath will look at all of the annotated genes in our data and infer the minimal set of biological pathways that can explain the presence of all these genes. It is important to note that this is just one approach (parsimony) to inferring pathways and other approaches also exist.
First create a directory for minpath results and change into it. Run the following commands from the top level of your project directory
mkdir minpath
cd minpath
Inputs for minpath will be prepared for each bin based on the prokka .tsv file. Start by looking at the .tsv file for a single bin
head ../prokka/metabat.5/metabat.5.tsv
You should see 9 genes displayed. Many will be missing annotations (called hypothetical protein) but some will have a gene name (eg manA), an EC (Enzyme Commission) number (eg 5.3.1.8), a COG (Clusters of Orthologous Genes) id (eg COG1482) and a protein name (eg Mannose-6-phosphate isomerase ManA).
For input to minpath we only want to keep a unique ID for each gene (column 1) and its EC number (column 5). We can transform the tsv into this format using awk like this
head ../prokka/metabat.5/metabat.5.tsv | awk -F '\t' '{print $1,$5}'
Note that here we are using -F '\t' to tell awk that our input is tab separated. We also want to filter the output to only include lines with an EC number
head ../prokka/metabat.5/metabat.5.tsv | awk -F '\t' '$5{print $1,$5}'
Next we need to ensure that the output is tab separated and we also need to remove the header line
head ../prokka/metabat.5/metabat.5.tsv | awk -F '\t' '$5{OFS="\t";print $1,$5}' | grep -v '^locus'
This of course only processes the first 10 lines … we need to change head to cat to include all genes
cat ../prokka/metabat.5/metabat.5.tsv | awk -F '\t' '$5{OFS="\t";print $1,$5}' | grep -v '^locus'
Finally we send the output to a file so that it can be used as input to minpath
cat ../prokka/metabat.5/metabat.5.tsv | awk -F '\t' '$5{OFS="\t";print $1,$5}' | grep -v '^locus' > metabat.5.ec
Now run minpath on this file as follows;
minpath -ec metabat.5.ec -report metabat.5.ec.report -details metabat.5.ec.details
Take a look at the top few lines of output
head metabat.5.ec.report
As an example consider the first line
path PWY-7321 any n/a naive 1 minpath 1 fam0 4 fam-found 2 name ecdysteroid metabolism (arthropods)
Important parts of this line are
- PWY-7321 which is a pathway identifier in the metacyc database. You can use this to lookup the full pathway. Eg PWY-7321
- fam0 4 tells us that four gene families are involved in this pathway
- fam-found 2 tells us that we found 2 gene families from the pathway in this genome
- name ecdysteroid metabolism (arthropods) is a name for the pathway
Now go back to check on your prokka job. You can do this by using the command squeue. Look for a job named run_prok and your username. When your job is done it will not appear in this list. You can also look at the output log file
tail ../prokka/slurm-XXX.out
When your job is done it should show Finished prokka on the last line of output.
When prokka is done you can run the following code to prepare minpath inputs for all bins.
while read bin;do
  cat ../prokka/$bin/${bin}.tsv | awk -F '\t' '$5{printf("%s\t%s\n", $1,$5)}' | grep -v '^locus' > ${bin}.ec
done < ../checkm/bbd_topbins.txt
Now run minpath on every bin. This should run pretty fast.
while read bin;do
  minpath -ec ${bin}.ec -report ${bin}.ec.report -details ${bin}.ec.details
done < ../checkm/bbd_topbins.txt
There is a huge amount of information in the outputs from minpath. To keep things tractable we are just going to look at two pathways.
The first pathway is named photosynthesis light reactions and has the metacyc code PWY-101. This pathway includes the essential components of photosynthesis that occur in light, Photosystem I and Photosystem II.
Use the following command to search for this pathway across all the bins
grep 'PWY-101' *.ec.report
Question 4.1
- How many bins contain at least one gene from this pathway?
- Which bin has all of the genes (ie a complete pathway)?
Cross reference your results with the output from gtdbtk to see the taxonomy of bins containing this pathway. Note that you will need to modify the commands below to use the correct bin numbers (these will be different for everyone).
grep 'metabat.26' ../gtdbtk/out/gtdbtk.bac120.summary.tsv
The second pathway is a little less obviously named. It is called superpathway of tetrathionate reduction and has metacyc code PWY-5360. This pathway is important because it includes enzymes required to reduce sulfite to hydrogen sulfide. Note that sulfite acts as the terminal electron acceptor in this pathway, however, in a broader sense the term “sulfate reducing” refers to micro-organisms that can produce sulfide from a range of oxidised sulfur compounds.
Question 4.2
- How many bins contain the pathway PWY-5360?
- What family (in a taxonomic sense) do these bins belong to?